Kubernetes Fundamentals - Part 2
This is part 2 of the 5 part series.
Recently, I decided to brush up my Kubernetes skills and the best way to do that is to write a blog post and share my notes with the community. This is a 5 part series where I explain various concepts of Kubernetes at a high level.
Who is the target audience?
The target audience are the people like me who want to brush up their Kubernetes knowledge or people who are newly starting with Kubernetes and want to build a basic understanding of Kubernetes.
Any pre-requisites?
The reader is expected to have basic understanding of Docker, Containerization and Container Registries.
Does the articles include hands on labs or samples?
These articles will focus on the theoretical concepts of Kubernetes, hence there are no hands on labs included with these articles. However, I have provided links to Kubernetes official documentation where you can find good hands on examples about the concepts discussed in these articles.
Which topics are discussed in part 2?
Commands and Arguments
Let’s start this topic by discussing about CMD and ENTRYPOINT instructions in Docker.
CMD
CMD instruction in Dockerfile defines the default program that will be run when the container starts.
Example: Run ubuntu image that prints a message using CMD instruction
#1 - Create a Docker File
FROM ubuntu
CMD ["echo", "This is the default message"]

#2 - Build docker image
docker build -t test-image .

#3 - Run the new image
docker run test-image

# Output
This is the default message
Let’s say you wish to override the default message:
docker run test-image echo "This is an updated message"

#Output
This is an updated message
The command-line arguments will override the CMD instructions in the above command and display the the new message ignoring the echo instruction in the docker file.
When to use CMD?
CMD instruction can be used to specify a default program that should run when the user does not provide any arguments in the command-line. This instruction ensures the container is in a running state by starting an application as soon as the container image is run. Additionally, it gives the flexibility to override the instructions specified within the Dockerfile through command-line arguments.
CMD instruction can be specified in following formats:
- CMD command param1
- CMD [“command”, “param1”]
ENTRYPOINT
ENTRYPOINT instruction also defines the program that will run when the container starts. However, unlike CMD instructions, the ENTRYPOINT instructions cannot be ignored or overridden with the command line arguments. Instead the command line arguments are appended to the already existing ENTRYPOINT instructions.
Example: Run ubuntu image that prints a message using ENTRYPOINT instruction
#1 - Create a Docker File
FROM ubuntu
ENTRYPOINT ["echo", "This is the default message"]

#2 - Build docker image
docker build -t test-image .

#3 - Run the image as container
docker run test-image

# Output
This is the default message
But, what happens when you pass arguments to the docker run command:
docker run test-image "This is another message"

#Output
This is the default message This is another message
In case additional command-line arguments are introduced through the CLI, the ENTRYPOINT is not ignored. Instead, the command line parameters are appended as arguments for the ENTRYPOINT command.
When to use ENTRYPOINT?
ENTRYPOINT instruction is suitable for use cases where you want to ensure that a specific program/command should always be run when the container starts.
CMD and ENTRYPOINT can also be combined into single Dockerfile. One of the examples for blending them together is to automate container startup tasks:
#1 - Create a Docker File
FROM ubuntu
ENTRYPOINT ["echo", "Hello"]
CMD ["John"]

#2 - Build docker image
docker build -t test-image .

#3 - Run the image as container
docker run test-image

#Output
Hello John

#4 - Run the container with different arguments
docker run test-image Micheal

#Output
Hello Micheal
CMD and ENTRYPOINT in the docker file can be used to specify the program that will be run when the container starts. The difference is, in case of CMD the command line parameters passed will entirely replace whatever is specified in CMD instruction but in case of EntryPoint the command line parameter will get appended to whatever is already specified in the Entrypoint instruction.
Command and Arguments in Kubernetes
When you create a Pod, you can define a command and arguments for the containers that run in the Pod. To define a command, include the command field in the configuration file. To define arguments for the command, include the args field in the configuration file. The command and arguments that you define cannot be changed after the Pod is created.
Example:
# Dockerfile
FROM ubuntu
ENTRYPOINT ["echo", "Hello"]
CMD ["John"]

# Pod definition file to override the name
spec:
  containers:
    - name: ubuntu
      image: ubuntu
      args: ["Micheal"] # This argument will override the CMD instruction in the Dockerfile

# Output
Hello Micheal
But what if you want to override the ENTRYPOINT instruction in the Dockerfile when creating a new Pod? For this you can use the command property in the Pod definition file.
Example:
# Dockerfile
FROM ubuntu
ENTRYPOINT ["echo", "Hello"]
CMD ["John"]

# Pod definition file to override the name
spec:
  containers:
    - name: ubuntu
      image: ubuntu
      command: ["echo", "Good morning"] # This property will change the ENTRYPOINT instruction specified in the Dockerfile
      args: ["Micheal"] # This argument will override the CMD instruction in the Dockerfile

# Output
Good morning Micheal
The command and arguments that you define in the configuration file override the default command and arguments provided in the container image (i.e. DockerFile). If you define args, but do not define a command, the default command is used with your new arguments.
Note: The command field in Pod definition file corresponds to ENTRYPOINT field in Docker File.
ConfigMap
ConfigMaps are a way to manage the configuration data centrally in Kubernetes. This data can then passed as environment variables to the pod definition. ConfigMaps are recommended to be used for storing non-confidential data, for confidential data use ‘Secrets’ (which we will discuss in the next topic). You can create different ConfigMaps for different purposes like Dev, Test, Prod etc.
There are two phases involved in using a ConfigMap:
-
Create the ConfigMap
apiVersion: v1
kind: ConfigMap
metadata:
  name: my-configmap
data:
  # key-value pairs
  port: "443"
  fileName: "log.txt"
  imagePath: "/images/"

  # file-like keys
  app_config.properties: |
    types=web,mobile
You can also create ConfigMap directly from a file using
kubectl create configmapcommand. -
Inject the ConfigMap into the Pod
# Inject the complete configmap
envFrom:
  - configMapRef:
      name: my-configmap # Name of config map

# Inject specific Key from configmap
env:
  - name: PORT_NUMBER
    valueFrom:
      configMapKeyRef:
        name: my-configmap # Name of config Map
        key: port #Key to be read from config Map

# Mount the configmap as Volume
volume:
  - name: app-config-volumed
    configMap:
      name: app-config # Name of config map
Secrets
Secrets are a way to store sensitive information in Kubernetes. They are similar to configMaps but the information is stored in hashed or encoded format.
Because Secrets can be created independently of the Pods that use them, there is less risk of the Secret (and its data) being exposed during the workflow of creating, viewing, and editing Pods.
Just like ConfigMaps, there are two phases involved in using Secret:
-
Create Secrets - You can accomplish this via imperative command or YAML definition file.
When creating a secret using YAML file, the secret value needs to be first encoded in base64 format and the encoded value should be added to the YAML file.
#1. base64 encode the values using following command: echo -n "sql01" | base64 #2. Add the base64 encoded values to the YAML file: apiVersion: v1 kind: Secret metadata: name: app-secret data: DB_HOST: bxu9292= DB_USER: sllsei3= DB_PASSWORD: cFtlwlsn= -
Inject the secret into the pods
# Inject the complete secret
envFrom:
   - secretRef:
       name: <secret-name>

# Inject specific secret into pod
env:
   - name: DATABASE_PASSWORD
       valueFrom:
         secretKeyRef:
           name: app-secret # Name of secret
           key: DB_PASSWORD #Key to be read from secret

# Inject as volume
 volume:
   - name: app-secret-volume
       secret:
         secretName: app-secret
Decode a secret:
echo "bXlwYXNzd29yZA==" | base64 --decode
Security Context
Docker Security
Process Isolation
Docker Engine is simply a host with Docker installed on it. When you install docker on Linux machine you get three components - Docker Daemon, REST API, Docker CLI.
- Docker Daemon is the background process that manages docker objects like images, containers, volumes and networks.
- REST API is the API interface that programs can use to talk to the Docker Daemon. (Custom tools or 3rd party tools can be created on top of this REST API).
- Docker CLI - Command Line Interface for working with Docker.
Docker uses the concept of linux Namespaces to provide isolation between containers. In Linux the parent process starts with PID 1 and then kicks of bunch of child processes. When a container starts it uses the concept of namespace where by the root process inside the container starts with PID 1, however from the host perspective it is just another process which is assigned next available PID [for e.g 4,5,6….]. The new PID 1 is only visible inside the container, so the container thinks that it has its own root process tree and so it is an independent system. All processes run on the same host but separated into their own containers using Namespaces.
How much CPU or Memory should a container be able to use? Docker uses cgroups to control the amount of resources a container can use.
docker run --cpus=.5 ubuntu #Makes sure that the container does not take more than 50% of the host CPU
docker run --memory=100m ubuntu #Limits the memory use to 100 MBs
Unlike VMs containers are not isolated from each other, containers share the OS kernel. Containers are isolated using Namespaces in Linux. When a docker container is run, it runs within its own namespace and it can only see and influence the processes running in its own namespace.
Users in Docker
Root User is the most powerful user in Linux. By default Docker runs process inside the container as a Root User. However, docker implements a set of security features that limits the abilities of Root user running within the container. So root user within the container does not have the same capabilities as the root user on the host. For e.g., The process running in the container as root does not have the capability to reboot the host, disrupt other processes running in other containers etc. However, you can add or remove capabilities of the root user (inside the container) as required.
As a best practices it is recommended to run the container as non-root user. This can be achieved by adding --user parameter in the docker run command.
# Example
docker run --user=1000 ubuntu

# Or, you can also set the USER in the Dockerfile
FROM ubuntu
USER 1000
Privileged Containers
Privileged containers in Docker are, concisely put, containers that have all of the root capabilities of a host machine, allowing the ability to access resources which are not accessible in ordinary containers. One of the use cases for Privileged container is when the container requires direct hardware access. If required you can run the container as privileged container by adding --privileged flag to the docker run command.
Generally, it is not a good security practice to run containers as privileged container due obvious reasons.
Security Context in Kubernetes
The concepts discussed in Docker security above, like adding/removing root user capabilities, running container as non-root user, privileged containers etc. are applicable in Kubernetes as well. This can be achieved though Security Context in Kubernetes. A security context defines privilege and access control settings for a Pod or Container.
- The security settings can be configured at the container level or at the Pod level.
- If security context is defined at both the pod level as well as container level, then the security context defined at the container level takes priority.
# Security Context at the Pod level
securityContext:
  runAsNonRoot: true
  runAsUser: 1000

# To check full list of properties that can be configured when setting security context at pod level, execute following command:
kubectl explain pod.spec.securityContext

# Security Context at the container level
securityContext:
  runAsNonRoot: true
  runAsUser: 1000
  capabilities: # Add/Remove Linux capabilities
    add: ["NET_ADMIN", "SYS_TIME"]
  allowPrivilegeEscalation: false

# To check full list of properties that can be configured when setting security context at container level, execute following command:
kubectl explain pod.spec.containers.securityContext
Privileged Containers - By default a container is not allowed to access any devices on the host, but a “privileged” container is given access to all devices on the host. This allows the container nearly all the same access as processes running on the host. Processes in privileged containers are essentially equivalent to root on the host. This is useful for containers that want to use linux capabilities like manipulating the network stack and accessing devices.
allowPrivilegeEscalation: Controls whether a process can gain more privileges than its parent process.
# Following command can be use to check which user is used to run the container inside the Pod:
kubectl exec <pod-name> -- whoami
Service Accounts
There are two types of accounts in Kubernetes:
- User Account - Used by humans to perform certain tasks on Kubernetes cluster. For example, Admin performing administrative tasks on the Kubernetes cluster or a developer deploying an application on Kubernetes.
- Service Account - is used by an application to interact with Kubernetes cluster. For example, Prometheus uses service account to poll k8s API to fetch performance metrics.
How do processes inside the container interact with API server?
Kubernetes creates a default service account for each namespace. This service account is automatically mounted on the newly created pod as a volume. You can access the API from inside a pod using automatically mounted service account credentials. However, the default service account is quite restricted and only has permissions to perform some basic tasks.
You can also create new service accounts and assign the required permissions using RBAC. This service account can then be used by a Pod to access Kubernetes API server instead of using the default service account.
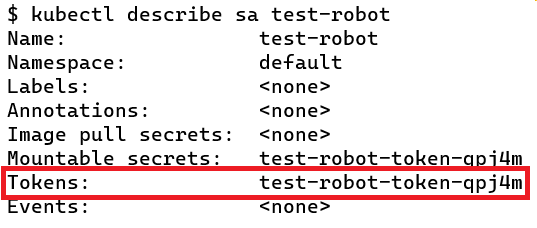
# Create a new Service Account
apiVersion: v1
kind: ServiceAccount
metadata:
  name: test-robot

# Add a new Service Account to the pod, instead of using the default service account
apiVersion: v1
kind: Pod
metadata:
  name: nginx
spec:
  serviceAccountName: test-robot
  containers:
    - name: nginx
      image: nginx
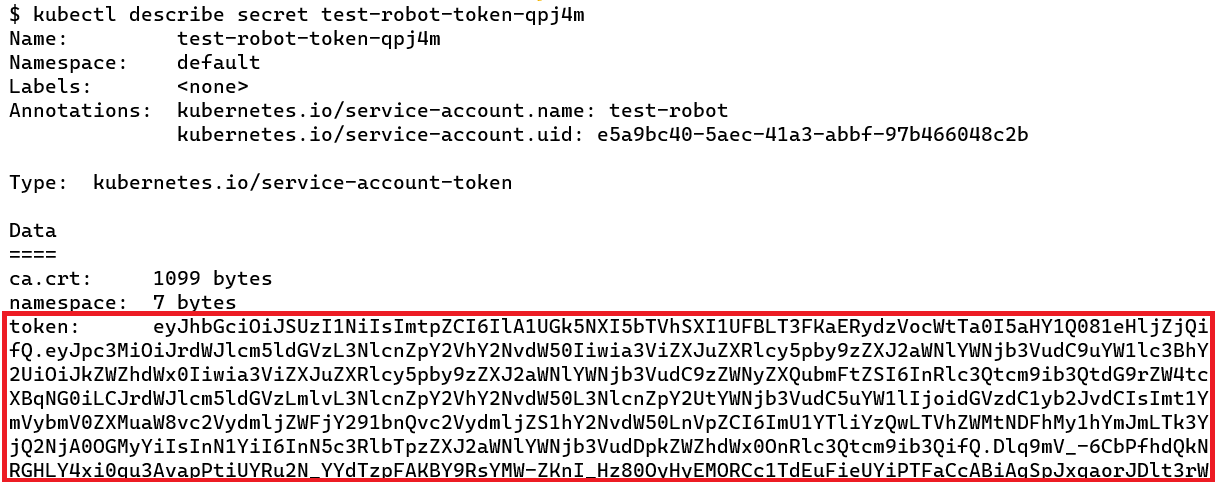
When a new Service Account is created, it also creates a service account token. This token is what must be used by the application when authenticating with Kubernetes API Server. This token is stored as a secret in Kubernetes.
Resource Requirements
When defining a Pod we can specify the resource requirements for each container inside that Pod. For example, 0.5 CPU and 2Gi Memory is required by a container to run. This information is used by the Kubernetes scheduler to decide which node to place the Pod on. For each container we can specify both minimum as well as maximum amount of resources required. If no resource limits are specified then a container can consume any amount of resources from the node as required.
resources:
  requests: #min. resources requested by the container
    memory: "256Mi"
    cpu: "100m"
  limits: #max. resources that can be allocated to the container.
    memory: "512Mi"
    cpu: "500m"
If the node where a Pod is running has enough of a resource available, it’s possible (and allowed) for a container to use more resource than its request for that resource specifies. However, a container is not allowed to use more than its resource limit. For example, when a process in the container tries to consume more than the allowed amount of memory, the system kernel terminates the process that attempted the allocation, with an out of memory (OOM) error.
If you only specify the limit and do not specify the request, then Kubernetes copies the limit you specified and uses it as the requested value for the resource.
If the scheduler does not find the required resources in the cluster to run the pod then the pod goes into a pending state.
Resource Units
CPU - Limits and requests for CPU resources are measured in cpu units. In Kubernetes, 1 CPU unit is equivalent to 1 physical CPU core, or 1 virtual core, depending on whether the node is a physical host or a virtual machine running inside a physical machine. CPU limit can be specified as millicores, for example:
0.1 CPU OR 100m # m stands for millicores
0.5 CPU OR 500m
1 CPU or 1000m
Memory - Limits and requests for memory are measured in bytes.
# Memory units
256M(Megabytes) # 1MB = 1000KB (Kilobyte)
1G(Gigabyte) # 1GB = 1000MB

# Or

256Mi(Mebibytes) # 1Mi = 1024Ki (Kibibyte)
1Gi(Gibibyte) # 1Gi - 1024Mi
Default resource limits
Since a Kubernetes cluster can be divided into namespaces, you can also set the resource limits at the namespace level by using ResourceQuota. Any pods created within the namespace cannot exceed the total resource consumption as specified in the ResourceQuota object.
apiVersion: v1
kind: ResourceQuota
metadata:
  name: mem-cpu-quota
spec:
  hard:
    requests.cpu: "1"
    requests.memory: 1Gi
    limits.cpu: "2"
    limits.memory: 2Gi
Apart from this you can also use LimitRanger admission controller to enforce minimum and maximum compute resources usage per Pod or Container in a namespace.
References
- Kubernetes documentation - Commands and Arguments
- Kubernetes documentation - ConfigMaps
- Kubernetes documentation - Secrets
- Kubernetes documentation - Security Context
- Kubernetes documentation - Service Accounts
- Kubernetes documentation - Resource management for Pods and containers
- Kubernetes documentation - Memory and CPU limits for a namespace
- Kubernetes documentation - LimitRanger

Leave a comment